



Grok Build CLI is xAI’s coding agent that you install and run in your terminal.
- Run the installer
- Learn the slash commands
- Approve plans before edits
- Run prompts in scripts
New to Grok Bot?
Get two weeks free on us.
Short answer
Grok Build CLI is xAI’s coding agent for the terminal. Install it on macOS, Linux, WSL or Windows, then open it in a project to work interactively. It also runs prompts in scripts and connects to other apps through the Agent Client Protocol (ACP).
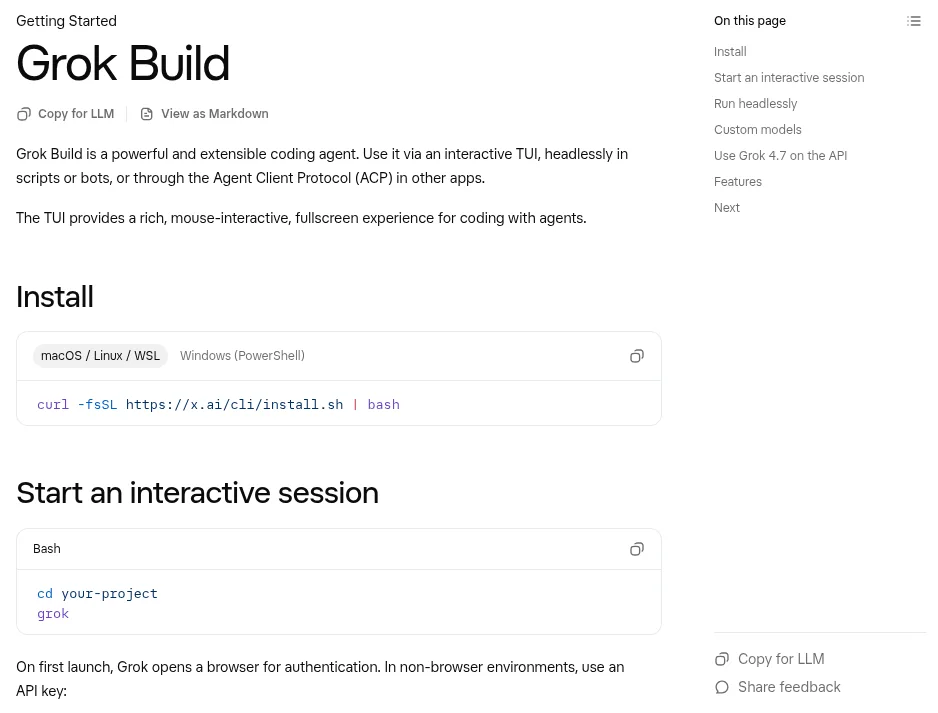
Install Grok Build CLI
Run the installer for your system, then start Grok from your project folder. The first launch opens a browser for sign-in.
# macOS, Linux or WSL
curl -fsSL https://x.ai/cli/install.sh | bash
cd your-project
grok
# Windows PowerShell
irm https://x.ai/cli/install.ps1 | iex- For a remote terminal, run
grok login --device-authto sign in with a device code. - In an environment without a browser, set
export XAI_API_KEY="xai-..."before starting Grok. - Try
Explain this repo.or@src/main.rs Walk me through this file.as a first prompt. - Run
grok logoutwhen you want to sign out and clear cached credentials.
Grok CLI Commands and Shortcuts
Running grok without arguments opens the interactive terminal interface. Inside it, slash commands manage the conversation; terminal commands run from your shell.
| Command or shortcut | What it does |
|---|---|
grok inspect | Show discovered rules, skills, plugins, hooks and MCP servers for the directory. |
grok models | List available models. Use /model <name> inside a session to switch. |
/effort | Set reasoning effort for the current model. |
/usage | View credit usage or manage billing. |
Ctrl+P | Open the command palette. /help also lists commands and shortcuts. |
Ctrl+. | Open the keyboard shortcut list; use Ctrl+X on Windows or in terminals without the Kitty keyboard protocol. |
Ctrl+C | Cancel a running turn. If the prompt is focused and has text, the first press clears that text instead. |
F2 | Open settings; /settings opens the same modal. |
Plan Mode and Tool Approvals
Plan mode explores the project and drafts a plan for approval. Shell commands and subagents can still write files, subject to permissions. Enter /plan for the next prompt, or /plan <description> to start immediately. These session modes differ from Grok Expert mode.
| Control | What happens |
|---|---|
| Plan | The parent session’s edit tools are limited to the plan file until you approve. Shell commands and subagents can still write files, subject to permissions. |
| Ask | The default permission mode prompts for calls that are not already allowed. |
| Auto | A classifier approves safe tools; dangerous calls can still prompt. Auto is available when its feature is enabled. |
| Always-approve | Tool calls are approved automatically, but deny rules and pre-tool hooks still apply. |
- Press
Shift+Tabto cycle Normal, Plan, Auto when available, and Always-approve. - In the plan preview, press
ato approve,sto request changes, orcto comment on a selected line or range. - Press
qto quit planning, or use/view-planto reopen a saved preview. Auto and Always-approve do not skip plan review. - Use
--allowand--denyfor per-run permission rules. A deny rule takes precedence over an allow rule.
Sessions, Forks and Worktrees
Grok saves prompts, responses, tool calls and file snapshots under ~/.grok/sessions/, grouped by working directory. Sessions work in the terminal interface, headless mode and ACP.
| Action | Command or result |
|---|---|
| Resume | /resume opens recent sessions for the workspace; grok -c continues the latest session in the current directory. |
| Branch a conversation | /fork creates a peer session with a copy of the conversation. Add --worktree for an isolated repository checkout. |
| Start in a worktree | grok -w starts a session in a worktree; --ref main chooses a base branch, tag or commit. |
| Rewind | /rewind lists a point for each prompt. Restoring one changes files on disk and removes later conversation; uncommitted reverted changes are lost. |
| Reclaim context | /compact compresses conversation history. /context shows current context use. |
| Export | grok export <id> [file] saves a transcript as Markdown. |
- Worktrees require a git repository and persist after a session ends.
grok worktree listshows tracked worktrees;grok worktree rm <ids...> --dry-runpreviews removal. For delegated work, see Grok Build subagents: the built-in explore and plan agents cannot edit files or run shell commands, while general-purpose has full capability.
Background Tasks and Scheduled Prompts
Commands, subagents and monitors can run while the conversation continues. A monitor turns each line printed by its script into a conversation notification.
/loop 5m Check if the test suite passes and report any failures- The loop runs immediately, then repeats as a new agent turn. Intervals accept seconds, minutes, hours or days; the minimum is 60 seconds.
- Loops expire after seven days, with at most 50 scheduled tasks active at once. Cancel one from the tasks pane or ask the agent to cancel it.
- Press
Ctrl+Gfor the tasks pane or use/tasksfor a snapshot.Ctrl+Bmoves a running foreground command into the background. - Select a background task in the scrollback and press
xto stop it.Ctrl+Topens the separate todo pane for planned work. - Prompts submitted during a running turn are queued by default. Use
/queueto list them orCtrl+;to open the queue panel. In a local Mac terminal, useCtrl+4ifCtrl+;does not arrive.
Sandbox, Hooks and MCP Servers
Permissions decide whether a tool call can run; the sandbox limits what an approved call can access. The sandbox is off by default. Use grok --sandbox workspace to permit writes in the working directory, Grok’s directory and temporary files. Enterprise-managed requirements can override this flag.
| Feature | Setup and limits |
|---|---|
| Sandbox profiles | read-only permits writes only to Grok’s directory and temporary files. strict restricts reads to the working directory and system paths. Both block child-process network access on Linux; that restriction does not apply on macOS. |
| Hooks | Commands or HTTP endpoints run at lifecycle events. Project hooks require trust: use /hooks-trust or start with --trust. /hooks opens the hooks tab. |
| MCP | grok mcp list shows servers, and grok mcp doctor checks configuration and connectivity. grok mcp add and grok mcp remove manage servers. |
| Project MCP | Add --scope project to write the server to .grok/config.toml. A project server replaces a user server of the same name. |
In the terminal interface, /mcps opens the MCP tab: press Space to toggle a server, r to refresh configuration, or i to authenticate an OAuth server. grok inspect shows loaded servers and their origins.
Run Grok Headless
Use -p to send one prompt without the full-screen interface. This is useful in scripts; grok agent stdio instead runs an ACP agent over standard input and output for integration with other apps.
grok -p "Explain this codebase" --output-format json --no-auto-update| Flag | Use |
|---|---|
--output-format | Choose plain for readable text, json for one object at the end, or streaming-json for newline-delimited events. |
--no-auto-update | Skip background update checks in scripts or CI. |
--cwd <PATH> | Set the working directory. |
-r <ID> / -c | Resume a session by ID or continue the latest in the current directory. |
-m <MODEL> / --effort | Select a model and reasoning effort. |
--max-turns <N> | Limit the number of agent turns. |
--no-plan / --no-subagents | Disable planning or subagents for the session. |
- For a multi-step script, read the session ID from JSON output and pass it to
-ron the next run.--fork-sessionbranches a resumed session into a new session ID.
Models, Pricing and Claude Code
Free lists limited agent requests; Plus costs $8 per month and includes Grok Build. Paid usage draws from the shared weekly pool. Grok 4.7 Fast is available in Cursor and Grok Build at twice standard token rates through your plan, and is excluded from Build’s free tier.
| Choice | Details |
|---|---|
| Custom model | Add its model ID, base URL and API key environment variable to ~/.grok/config.toml; use grok inspect to check discovered configuration. |
| Claude Code | Claude Pro includes Claude Code for $20 monthly, or $17 per month billed annually. See Grok Bot vs Claude for the broader comparison. |
| Import sessions | Run grok import to bring in Claude Code sessions. /import-claude opens the settings import modal. |
| Existing flags | Grok accepts aliases including --allowedTools, --disallowedTools and --append-system-prompt. |
| Cursor | See Grok Bot in Cursor for the related workflow. |
- The community project named grok-cli is separate from xAI’s CLI. Grok Build in the app is also distinct: it builds apps in chat and can publish them to grok.me, while the CLI works in the terminal.
FAQ
What Is Grok Build CLI?
Quick answer: It is xAI’s terminal coding agent. It supports interactive sessions, headless prompts and ACP integration.
How Do I Install Grok Build CLI?
Quick answer: Run the installer for your platform, change to your project directory and enter grok. The first launch opens a browser to sign in.
Can I Run Grok Build in a Script?
Quick answer: Yes, use grok -p followed by a prompt. Choose JSON or streaming JSON with --output-format when another program needs the output.
Can I Import Claude Code Sessions?
Quick answer: Yes, run grok import to import sessions. Inside the terminal interface, /import-claude opens the settings import modal.
Does Plan Mode Approve Edits Automatically?
Quick answer: No, Plan mode opens a preview for review. The parent session’s edit tools are limited to the plan file until approval. Shell commands and subagents can still write files, subject to permissions. Auto and Always-approve do not skip the review.
Swarm School is an independent site. We’re not affiliated with xAI or Cursor.
Sources
- Official documentation https://docs.x.ai/build/features/sessions
- Official documentation https://docs.x.ai/build/features/background-tasks
- Official documentation https://docs.x.ai/build/features/worktrees
- Official documentation https://docs.x.ai/build/features/permissions
- Official documentation https://docs.x.ai/build/features/sandbox
- Official documentation https://docs.x.ai/build/features/hooks
- Official documentation https://docs.x.ai/build/features/mcp-servers
- Official documentation https://docs.x.ai/build/cli/headless-scripting
- Grok Build CLI https://x.ai/news/grok-build-cli
- Grok Build docs https://docs.x.ai/build/overview
- Grok Build modes https://docs.x.ai/build/modes-and-commands
- Claude pricing https://claude.com/pricing
- Official documentation https://docs.x.ai/build/cli/reference
- Official documentation https://docs.x.ai/build/features/plan-mode
- Official documentation https://docs.x.ai/build/features/subagents
- Official documentation https://docs.x.ai/build/keyboard-shortcuts
Swarm School is independent and not affiliated with Grok Bot’s makers. Features change; check the official docs for current details.
Related Guides

Grok Build Subagents: What They Are and How to Use Them
Grok Build subagents handle parts of a coding task in separate contexts and report back. Learn the built-in types, custom agents, controls and limits.

Grok Bot vs Claude: an Honest Comparison
Grok Bot vs Claude, including Claude Code: how each works, pricing, limits and which to pick, from both companies' docs.

Grok Bot and Cursor: How They Work Together
How Grok Bot works with Cursor: it comes with paid Cursor plans, signs in with your Cursor account, runs in Cursor's cloud, and can start Cursor Cloud Agents.
Grok Expert Mode: What It Is and When to Use It
Understand Grok Expert mode, compare Fast, Auto and Heavy, and choose the right mode for your next question.